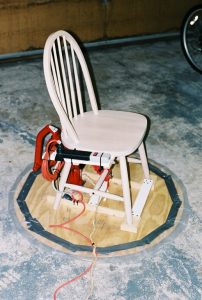
Riding on a hovercraft is something that many kids fantasize about. Turn their dreams into reality by getting them involved in this easy science project that utilizes household items. Learning the basics of thrust and propulsion in Physics comes as a bonus. Since the DIY involves working with electricity, adult supervision is a must.

Homemade Hovercraft
Materials
- 3/4th-inch plywood sheet
- Heavy duty shower curtain
- Gas or electric leaf blower
- Lid from a gallon paint can
- 2 rolls of duct tape
- Assorted screws
- Staple gun
- Wood cutting tools and drills
- A light chair (optional)
- Foam pipe insulation (optional)
DIY Instructions
- Cut a circle of 4-foot diameter out of the plywood.
- Position the leaf blower at the center to find out where the nozzle ends up.
- Trace round the nozzle and cut a hole for it to fit tightly.
- For the skirt, lay the shower curtain down flat and place the plywood circle on top.
- Fold the curtain up around the edges and secure it along the entire perimeter with the staple gun.
- Cut the excess curtain off and seal all around with duct tape. It should be airtight. You should not skimp.
- The gallon paint can lid is now nailed in the center from the underside to hold the skirt down.
- Cut 6 2-inch holes in the curtain along a circle maintaining a distance of about 2 inches from the lid.
[N.B. The air that escapes from the “pillow” of the shower curtain will be the cushion that puts the hover in your craft.]
- Attach the leaf blower with screws and seal the nozzle to the hole you cut in step 3 with duct tape.
- As a safety measure, you may also stick pipe insulation that comes with its own adhesive around the plywood edge.
- Now your hovercraft is ready to fire up. You may screw a chair on top of the disc for comfortable seating. If you feel that the leaf blower needs more space use wooden risers under the legs.
- Get your hovercraft into motion by powering the leaf blower and asking someone to give an initial push. You are off on your ride!
Keep the center of gravity as close to the ground as possible as the absence of sufficient friction can make the craft slip under you pretty fast.
How to Make a Hovercraft Video
Though this video utilizes the basic design outlined above, the addition of a brake for motion control refines the DIY.
How Does It Work?
On switching on the gas blower, the produced air creates a cushion of air bounded by the shower curtain. Though the volume of the air is not much the large area that it is spread over results in a considerable lifting power. The air escaping from the holes gives the necessary hovering force. The gas layer also reduces the friction of the ground enabling the gliding action.
The hovercraft experiment is ideal for science fairs and schools. A small model can be a favorite kid’s toy. Once you are successful in building one on your own with this simple plan, you may go ahead and improve it further with the help of other elaborate plans available for free on the Internet. Constructing a personal mini hovercraft from scratch at home could serve as an inspiration for your little one for an engineering career.

Leave a Reply